
Jenkins is a widely used platform for automating the process of integrating new changes into deployed code. It belongs to an area called CI/CD continuous integration or continuous deployment. The dream here is to automate the steps required to deploy code after updates or changes have been made.
❓ Why do you think senior developers are really keen on this kind of deployment?
For your apprenticeship there are some skills that you'll need to demonstrate related to this topic and they are:
S10: build, manage and deploy code into the relevant environment
S11: apply an appropriate software development approach according to the relevant paradigm (jenkins piplines are event driven or procedural)
S14: follow company, team or client approaches to continuous integration, version and source control
The aim of this workshop is to take a software project and deploy it into AWS. You will have completed the workshop challenge when you can make a change to the code base, push your changes and then without touching anything have your change propogate to the live version of your app running on AWS. This is called continuos deployment.
The software project is here. Can you down load this unzip it and try to get it running locally.
We are going to start by trying to execute the steps manually. This is helpful for us so we can make sure we have every credential, secret and setting correct before we automate the process.
gradle clean testgradle bootJardocker build -t ${your_docker_username}/moodtracker .docker push ${your_docker_username}/moodtrackerdocker-compose.yaml file with the environmental variables ports etcdocker compose up -dThe environmental variables the app needs to be tested, built or run are:
MOD2_AUTH0_CLIENT_ID=•••••••••••••••••
MOD2_AUTH0_CLIENT_SECRET=•••••••••••••••••••••••••••••••••••••••••••••••••••
MOD2_AUTH0_ISSUER=•••••••••••••••••
Your coach can share these with you or you can set up your own Auth0 project.
We can run our own local instance of Jenkins. Below is a docker-compose.yaml that you can use. Update this with a path to keep all the Jenkins file somewhere on your file system. For this to work you have to have docker installed and running on your host machine.
version: "3"
services:
  jenkins:
    container_name: jenkins
    image: bmordan/jenkins-with-docker
    privileged: true
    user: root
    ports:
      - 8080:8080
      - 50000:50000
    volumes:
      - ${YOUR_PATH_ON_YOUR_FILE_SYSTEM}:/var/jenkins_home
      - /var/run/docker.sock:/var/run/docker.sock
    networks:
      - jenkins
networks:
  jenkins:
Start the service with docker compose up -d visit http://localhost:8080. You will need the admin password which is in the container. You can access the password with the following docker command:
docker exec jenkins cat /var/jenkins_home/secrets/initialAdminPassword
You can create an admin user and log in. Skip installing plugins (we will come back to that). What we are now looking at is an instance of Jenkins. We can use this to program automations of all kinds. It is a versatile and powerful platform with a plugin architecture. So if Jenkins doesn't yet do what you need it to, you can extend it by writing your own plugin.
Let's create our first pipeline.
pipeline {
    agent any
    stages {
        stage("Hello") {
            steps {
                echo "Hello World"
            }
        }
    }
}
There are 2 styles of Groovy scripting you might see. The declarative style (used above) or the plain script style which looks more like this:
node {
    // commands
}
Can you update the script to print out the working directory of the jenkins agent? You will need to update the script which you can access again in Configure.
pipeline {
    agent any
    stages {
        stage("Hello") {
            steps {
                echo "Hello World"
            }
        }
        stage("PWD") {
            steps {
                sh "pwd"
            }
        }
    }
}
Above you can see that we have added another stage, and we are executing shell commands in a linux environment, we are not on our own file system we are inside an agent.
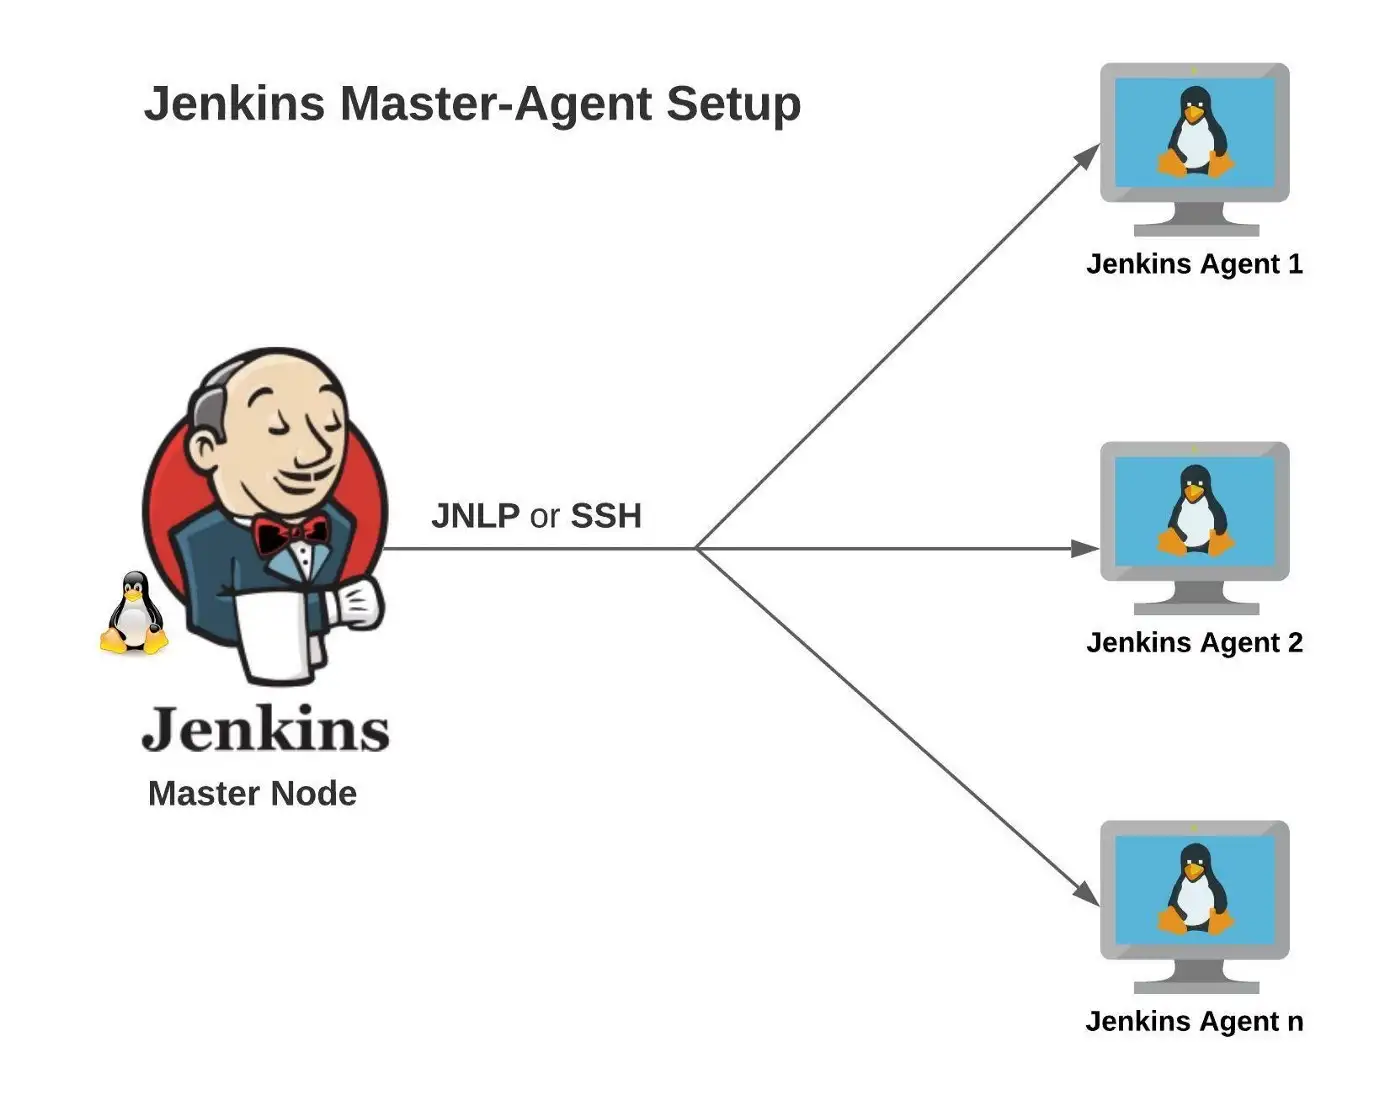
Jenkins is central control. That is where we program pipelines, organise our pipelines and monitor them. The actual work of cloning repos, building apps etc is all done on agents. This are agent instances, they can be other nodes (other computers) and we can define them and what software they have installed upon them.
The next step we want to take is being able to pull a project from source control and start to work with it. Can you create a pipeline that pulls the moodtracker project and lists all the files with the ls -l command.
For Jenkins to pull and push to your repo it will need your bitbucket logins. You can avoid using your bit bucket password by generating an access token. If you goto your personal setting, you will see App passwords You can create one for Jenkins. Add your credentials to Jenkins:
Dashboard -> Manage Jenkins -> Manage Credentials -> System -> Global credentials (unrestricted) -> + Add Credentials -> Username with Password
Now try to use them in a pipeline script
pipeline {
    agent any
    stages {
        stage("clone") {
            steps {
                git credentialsId: 'YOUR_ID', url: 'https://bitbucket.org/bernardmordan/spring-oauth-example/src/master/'
                sh 'ls -l'
            }
        }
    }
}
Can you check out a branch? What happens if you try to run the tests with gradle test?
It's likely your pipeline now FAILS with gradle: not found. We need the gradle tool to test and build our app. There are 2 ways to approach this:
To configure the global gradle.
Add gradle give it a name/label and select the version you want to have installed. You can have different versions installed a select then via there name or label.
Save your changes. I called my install Gradle 8.
Now in your pipeline script you can declare at the pipeline or stage level that you want the gradle tool available. Like this
pipeline {
    agent any
    tools {
        gradle 'Gradle 8'
    }
    environment {
        MOD2_AUTH0_CLIENT_ID = credentials("MOD2_AUTH0_CLIENT_ID")
        MOD2_AUTH0_CLIENT_SECRET = credentials("MOD2_AUTH0_CLIENT_SECRET")
        MOD2_AUTH0_ISSUER = credentials("MOD2_AUTH0_ISSUER")
    }
    stages {
        stage("hello-github") {
            steps {
                git credentialsId: 'github', url: 'https://github.com/MultiverseLearningProducts/java-moodtracker-app'
                sh 'java --version'
                sh 'gradle --version'
            }
        }
        stage("Test") {
            steps {
                sh 'gradle clean test'
            }
        }
    }
}
Can you see I am using environmental variables in the set up for the pipeline. The application needs these to run integration tests and to build the app. You can add these in Dashboard -> Manage Jenkins -> Manage Credentials -> System -> Global credentials (unrestricted) -> + Add Credentials -> Secret text the ID would be something like MOD2_AUTH0_ISSUER as above. Once these are created you can access them in your pipelines as we are doing so above.
That might not work...
This project needs java 17, the jenkins server only has java 11 installed on it. We can install java 17 as well, but there is lots of futizing to get JAVA_HOME defined and it is easier to now try the other way of working with agents.
The second way to work with agents is to define a docker image you would like the pipeline or stage to run in. We want something with both gradle and java 17. Let's update our script to use a docker container:
Make sure you have the following plugins installed
pipeline {
    agent {
        docker {
            image 'gradle:7.6.0-jdk17'
        }
    }
    environment {
        MOD2_AUTH0_CLIENT_ID = credentials("MOD2_AUTH0_CLIENT_ID")
        MOD2_AUTH0_CLIENT_SECRET = credentials("MOD2_AUTH0_CLIENT_SECRET")
        MOD2_AUTH0_ISSUER = credentials("MOD2_AUTH0_ISSUER")
    }
    stages {
        stage("hello-github") {
            steps {
                git credentialsId: 'github', url: 'https://github.com/MultiverseLearningProducts/java-moodtracker-app'
                sh 'java --version'
                sh 'gradle --version'
            }
        }
        stage("Test") {
            steps {
                sh 'gradle clean test'
                sh 'gradle bootJar'
            }
        }
    }
}
This is quite a moment. What a powerful tool we now have to automate workflows. Can you now build out the pipeline to clone, test and build the project? We want to end up with access to the .jar file for the project. Try ending your pipeline with this command:
sh 'ls -l build/libs/*.jar'
You will need an AWS account. Log into the developer console and follow the steps to create a new instance. Make sure you know where the .pem file is once it is downloaded. Make a note of the public ip address.
To install docker on EC2 use the commands below once you have ssh into the machine. I find you usually have to restart the instance to get docker working ok.
sudo amazon-linux-extras install docker
sudo service docker start
sudo usermod -a -G docker ec2-user
sudo chkconfig docker on
sudo curl -L https://github.com/docker/compose/releases/download/1.22.0/docker-compose-$(uname -s)-$(uname -m) -o /usr/local/bin/docker-compose
sudo chmod +x /usr/local/bin/docker-compose
sudo reboot
version: "3"
services:
  moodtracker:
    container_name: moodtracker
    image: bmordan/moodtracker
    ports:
      - 8080:8080
    environment:
      - MOD2_AUTH0_CLIENT_ID=•••••••••••••••••
      - MOD2_AUTH0_CLIENT_SECRET=•••••••••••••••••
      - MOD2_AUTH0_ISSUER=•••••••••••••••••
Change bmordan/moodtracker to the name of your docker container. Try and run moodtracker on your EC2 instance. You don't have to use docker compose file you can use the docker run command based on the following example.
docker run -e MOD2_AUTH0_CLIENT_ID=$MOD2_AUTH0_CLIENT_ID -e MOD2_AUTH0_CLIENT_SECRET=$MOD2_AUTH0_CLIENT_SECRET -e MOD2_AUTH0_ISSUER=$MOD2_AUTH0_ISSUER --name=moodtracker -p 8080:8080 -d bmordan/moodtracker
Now if you visit http://your-ec2-addr.amazon.com you should see the login button. We'll not be able to login without updating the allowed redirect_uri in our Auth0 applications settings page on Auth0 site.
So far on Jenkins we can test and build the moodtracker app. Now we want to take that jar file, wrap it in a docker container that has jdk17 and have the launch command set so when the container starts our app starts on port 8080.
Can you have a go at making the Dockerfile?
Push your image to docker hub. Now we want to automate that stage of deployment. We will have to review the pipeline. The first part of the pipeline needs gradle and java 17 but not docker, the second part of the pipeline needs docker, but not gradle and java 17. We can split the pipeline up and use different agents for the different sections.

Update your pipeline to not declare a global agent. Now you have to declare the kind of agent you want to run each stage.
pipeline {
    agent none
    environment {
        MOD2_AUTH0_CLIENT_ID = credentials("MOD2_AUTH0_CLIENT_ID")
        MOD2_AUTH0_CLIENT_SECRET = credentials("MOD2_AUTH0_CLIENT_SECRET")
        MOD2_AUTH0_ISSUER = credentials("MOD2_AUTH0_ISSUER")
        DOCKER = credentials("DOCKER_CREDENTIALS")
    }
    stages {
        stage("Test") {
            agent {
                docker {
                    image 'gradle:7.6.0-jdk17'
                }
            }
            steps {
                sh 'gradle clean test'
                sh 'gradle bootJar'
            }
        }
        stage("Dockerize") {
            agent {
                docker {
                    image 'docker:dind'
                }
            }
            steps {
                script {
                    image = docker.build('bmordan/moodtracker')
                    sh 'echo $DOCKER_PSW | docker login -u $DOCKER_USR --password-stdin'
                    sh 'docker push bmordan/moodtracker'
                    sh 'docker logout'
                }
            }
        }
    }
}
You will have to add your docker credentials to your Jenkins instance. You can obtain a docker access token in place of using your docker hub password (profile -> Account Settings -> Security -> Access Tokens). In the Dockerize stage we are using the "Docker in Docker" or docker:dind image to run docker commands to build the image for our jar file and then push it to docker hub.
Now we are ready to connect to our AWS machine and pull the image. You will need to add your ?.pem file to Jenkins. Goto the manage credientials section and add the contents of your .pem file to SSH Username with private key. Add your key's text, the username will be ec2-user, give this credential an ID like AWS_PEM_KEY. Now you are ready to implement the final step.
stage("Deploy") {
    agent any
    steps {
        sshagent(credentials: ["AWS_PEM_KEY"]) {
            sh "ssh -o StrictHostKeyChecking=no ec2-user@your-ec2-instance-ip 'docker pull bmordan/moodtracker'"
            sh "ssh -o StrictHostKeyChecking=no ec2-user@your-ec2-instance-ip 'docker stop moodtracker || true && docker rm moodtracker || true'"
            sh "ssh -o StrictHostKeyChecking=no ec2-user@your-ec2-instance-ip 'docker run -e MOD2_AUTH0_CLIENT_ID=$MOD2_AUTH0_CLIENT_ID -e MOD2_AUTH0_CLIENT_SECRET=$MOD2_AUTH0_CLIENT_SECRET -e MOD2_AUTH0_ISSUER=$MOD2_AUTH0_ISSUER --name=moodtracker -p 8080:8080 -d bmordan/moodtracker'"
        }
    }
}
Now when you make changes and push to version control your pipeline can test, build, containerize and deploy your moodtracker app.
This final section is useful introduction to setting up https so you have a secure encrypted site. Without https data in requests are in plain text and anyone can intercept your http request and read it. So passing passwords or other data over http is not secure.
This will feel fiddly because it is. We are going to do the following.
If you look at a service like https://www.godaddy.com/en-uk or https://www.gandi.net/en-GB you should be able to purchase a domain name for a few pounds. For example, I bought bernardmordan.dev for £2.95 - you don't need to spend more than the price of a coffee, see what you can get, it can be anything i.e. rhubarb-bikini.shop is £0.96.
In your DNS management console you need to find your A record and point this domain at your ec2 using your ec2 ip address. My A record looks like this.

The TTL is the time it takes to update and have your new setting working. It can take many hours. You can see the ip address 13.42.55.28 that is from my ec2 instance.
This is a web server there are other options like Nginx which work in a very similar way. Run the following commands one at a time
sudo yum install -y httpd
sudo systemctl start httpd
sudo systemctl enable httpd
To check all is set up visit http://my.ip.addr.here you should see the Apache test page. Notice the http:// nothing will show if you request via https:// that is what we are working on now.

You can now put static assets into /var/www/html/ folder and they will be served at your host address http://my.ip.addr.here. Add your ec2 user to the apache group.
sudo usermod -a -G apache ec2-user
Log out and log back in again to pick up the group exit -> reconnect with your ssh command. Change the group ownership of /var/www and its contents and future contents to the apache group.
sudo chown -R ec2-user:apache /var/www
sudo chmod 2775 /var/www && find /var/www -type d -exec sudo chmod 2775 {} \;
find /var/www -type f -exec sudo chmod 0664 {} \;
Goto your ec2 security tab and open up port 443. You can close port 8080.
sudo amazon-linux-extras install epel -y
sudo yum install -y certbot python2-certbot-apache
sudo certbot
Follow the prompts - get your certs installed. Open /etc/crontab and add the cron job (twice daily cert checking):
39 1,13 * * * root certbot renew --no-self-upgrade
Then restart the cron daemon sudo systemctl restart crond. Cron is a task schedule tool to set a script to run on a regular basis. Its like setting a daily alarm clock to wake you up every day at 07:10. Or in our case check our certs are not out of date every day at 13:13.
Certbot is a small python script that automates the dance of requesting a certificate from the letsencrypt service. It saves the certs on the ec2 instance and updates some of your Apache config. When traffic now enters and leaves your web server it can be encrypted using these keys and certificates.
This is going to pass https traffic from port 80 (which has apache running on it) to port 8080 which has our moodtracker app running on it.

There are 3 files we need to edit. You can edit files on your ec2 instance using the nano command line editor.
/etc/httpd/conf/httpd.conf/etc/httpd/conf/httpd-le-ssl.conf/etc/httpd/conf.d/ssl.confIn /etc/httpd/conf/httpd.conf update the VirtualHost definition to this
Listen 80
<VirtualHost *:80>
    ProxyPreserveHost On
    ProxyRequests Off
    DocumentRoot "/var/www/html"
    ServerName "example.com"
    ServerAlias "www.example.com"
    ProxyPass / http://127.0.0.1:8080/
    ProxyPassReverse / https://127.0.0.1:8080/
    RewriteEngine on
    RewriteCond %{SERVER_NAME} =www.example.com [OR]
    RewriteCond %{SERVER_NAME} =example.com
    RewriteRule ^ https://%{SERVER_NAME}%{REQUEST_URI} [END,NE,R=permanent]
</VirtualHost>
In /etc/httpd/conf/httpd-le-ssl.conf add similar config - notice this is for port :443 which is the port dealing with encrypted https requests.
<VirtualHost *:443>
    DocumentRoot "/var/www/html"
    ServerName "example.com"
    ServerAlias "www.example.com"
    SSLProxyEngine on
    ProxyPreserveHost On
    ProxyPass / http://127.0.0.1:8080/
    ProxyPassReverse / https://127.0.0.1:8080/
    Include /etc/letsencrypt/options-ssl-apache.conf
    SSLCertificateFile /etc/letsencrypt/live/bernardmordan.dev/fullchain.pem
    SSLCertificateKeyFile /etc/letsencrypt/live/bernardmordan.dev/privkey.pem
</VirtualHost>
In /etc/httpd/conf.d/ssl.conf just add SSLProxyEngine on the line below SSLEngine on.
Now you can update the redirect URLs on Auth0 and your moodtracking app should be provisioned and served over https.
You have been introduced to Jenkins. You know about AWS. Can you take on this challenge?
Here are the files for a static site.
https://github.com/bmordan/audio-grid-apprun (github repo)
https://github.com/bmordan/audio-grid-apprun/archive/refs/tags/1.0.0.zip
Can you build a pipeline that deploys this site to an AWS S3 bucket? Setting up a S3 bucket as a static web host is quite straight forward, can you figure out how to clone the repo, then copy the files to the AWS bucket? Be really nice if this happened when you push to the repo (you will need to fork the repo to push code changes).