
Today we are going to use Basic Auth to secure a RESTful API.
Authenticationis the process of verifying who a user is
Authorisationis the process of verifying what they have access to
Here's an example to illustrate this:
Imagine you have booked a hotel room. When you get to the checkout you are asked for you driving license to prove who you are - this is authentication.
Once authentication is complete, you are given a key card which gives you entry to your room - this is authorisation as you are being granted access to a resource (in this case your room). You are not authorised to access any other rooms.

In breakout rooms, determine which of the following are examples of authentication and which are examples of authorisation:
❓ Imagine if we held all our users' passwords in plaintext. What risks do you think this could cause?
Answer - we will have leaked sensitive information that your users have trusted you with. Imagine if they used the same username and password on other sites. Your organisation could face very large fines under the General Data Protection Regulation (GDPR) and suffer serious damage to its reputation - listen to this video to hear about one recent example.
To avoid storing passwords in plaintext, we hash them with an one-way hashing function. You learnt about hashing last week. If the cryptographic function used for the hashing is strong, then it's computationally impossible to calculate the original password from the hash.
As a reminder, here is some code which implements a secure hashing algorithm:
const bcrypt = require('bcrypt')
...
bcrypt.hash('password101', 10).then(console.log)
// $2b$10$AQXoVkfzAovJ9RHTtmd6N.Yegy3V9ALTlYDcCM76HxBqq044q6xLK
import org.springframework.security.crypto.bcrypt.BCryptPasswordEncoder;

//...
BCryptPasswordEncoder passwordEncoder = new BCryptPasswordEncoder();
String hashedPassword = passwordEncoder.encode("your password");
// $2b$10$AQXoVkfzAovJ9RHTtmd6N.Yegy3V9ALTlYDcCM76HxBqq044q6xLK
Once you have your hash you can check it like this:
bcrypt
    .compare(
        "password101",
        "$2b$10$AQXoVkfzAovJ9RHTtmd6N.Yegy3V9ALTlYDcCM76HxBqq044q6xLK"
    )
    .then(console.log);
// true
BCryptPasswordEncoder passwordEncoder = new BCryptPasswordEncoder();
boolean isMatch = passwordEncoder.match("your password", "$2b$10$AQXoVkfzAovJ9RHTtmd6N.Yegy3V9ALTlYDcCM76HxBqq044q6xLK");
// true
The bcrypt npm library will automatically incorporate a salt. Bcrypt stores the salt along with the password (and the algorithm and cost factor) in its output, so you don't need to worry about storing the salt seprately.

users table in your database with id, username and passwordHash columns/users endpoint to your server (sign-up)users
| id | username | passwordHash |
| --- | -------- | ------------------------------------------------------------ |
| 1 | hello123 | $2y$12$O8kKZKMclRFlBz8rCa1Gb./zoydaFZcj2/s23pOQI3wpT/8xEZb4e |
| 2 | dog990 | $2y$12$2K3rJl8zC.0ck9hNstWJk.o2mXyBXB.qmSXwlPIqt8r0om/qj0Z2e |
Resources on a server often need protecting. Servers typically contain sensitive information which must be kept private, or resources which only certain users should be allowed to modify.
Now we have our API we need to consider how we will secure access to the API. For this we will use a username and password, commonly known as Basic Authentication.
Basic authentication is a simple authentication scheme that is built into the HTTP protocol. The client sends an HTTP request with an Authorization header that contains the word Basic followed by a space and a base64-encoded string username:password
Here is an example:
Authorization: Basic ZnJlZC5mbGludHN0b25lQHdoaXRlaGF0Lm9yZy51azpteXBhc3N3MHJk
That long string of numbers and letters after the word "Basic" is a base64 encoded string. You can encode and decode base64 strings in your browser using a pair of functions called atob and btoa. Try it. In your console encode the following string "Hello you".

From the string in the Authorization header above, determine the user's username and password.
❓ Do you think Basic Authentication is a secure scheme?
Basic auth uses the Authorization header in the HTTP request, along with the "Basic" keyword and a base64 encoded string in the following format username:password. To validate that a user's login details are correct using Basic auth the server will look in the headers for this base64 encoded string and decode it. Now the server has the username and password sent from the client we need to match it with the username and password held in our database.
To protect resources, we need to authenticate the user making the request. We are using basic auth to do that by putting the username:password in the headers of the request.
Our server now needs to check the request is authentic and from a user it knows before responding. That check needs to happen before we respond.
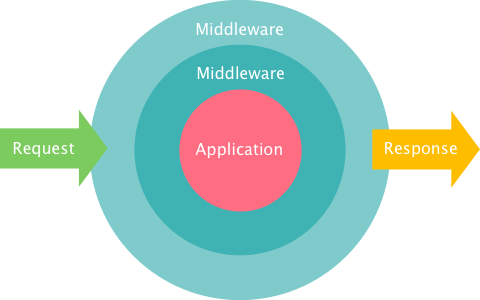
As that check happens in the middle of the request response cycle, it has been given the name of middleware. This is a generic design pattern you will see in many systems.
A whole series of things can happen in middleware not just authentication, but also authorisation. Thats why the diagram above has 2 middleware rings. There are 2 middlewares the request has to pass through before it gets to the controller. Below is a general pattern for a middleware function.
function myMiddleware(request, response, next) {
    // check or change something in the request
    // maybe its not ok so from here you might
    return response.code(403); // status code 403 forbidden
    // the controller was never reached!
    // maybe all is well and you can contiune with the request
    // calling next() finishes this middleware and goes onto
    // either the next middleware or into the controller/route handler itself
    return next();
}
❓ What other things might you want to do in middleware?
❓ is the password sent on every request or cached?
If you are using Express, you can make the entire application use a middleware function through
app.use(myMiddleware);
or a single endpoint like:
app.get('/restaurants', myMiddleware, (req, res) => {
  ...
});
Secure your API with basic authentication. Requests to your API will now need to include valid credentials (following the basic auth protocol) for users saved in your database. To achieve this, create a middleware function that checks an incoming request's authorization header to ensure that the username and password sent are valid.
Create a simple form which sends a username and password to your API using Basic Auth (i.e. simulates what Postman was doing in the previous lesson).